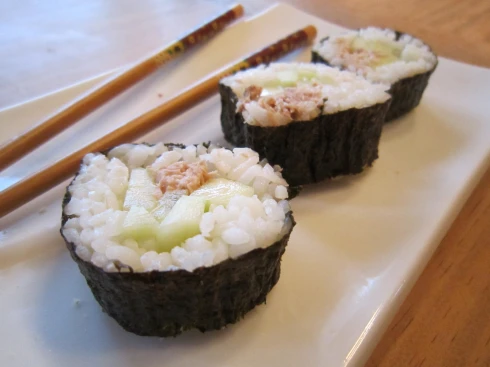
I don’t know what it’s like where you come from, but here in Victoria, British Columbia we have seen some strange health trends over the past few years (Vancouverites, I know you’ll agree): a cult-like obsession with yoga and form-fitting Lululemon pants, a substantial market of people who are willing to pay over $6 for a small loaf of organic bread containing enough seeds to keep the local bird population thriving through the winter…and then there is Sushimania, where the health-conscious pay through the nose for rice, seaweed and fish that the chef was too lazy to cook. Although I do enjoy things Japanese – the food, the tea ceremonies, the culture – and have voraciously read the novel Shogun, I have a difficult time paying such a hefty bill for something so inexpensive to make at home. I do that with coffee already and feel guilty enough.
A Japanese friend of mine showed me how to make very basic tuna sushi rolls which take under 30 minutes to prepare and only cost about $5 for enough rolls to plump up a roomful of hungry Victorians. There are many different ways to prepare Sushi, but this is one of the simplest rolls I’ve found, so it’s a good entry-level dish before attempting the preparation of eel, puffer fish or fish roe that pop in your mouth and set off the gag reflex.
Although sushi is relatively cheap to make, you’ll have to invest in a few inexpensive tools and ingredients that should last you a while:
- For starters, you could pick up an electric rice steamer/cooker to give you no-hassle sticky rice, though I just use a regular medium-sized saucepan and lid which results in rice sticky enough.
- You will, however, need a sushi mat (roughly 8 inches x 7 inches) made of thin wooden sticks tied together with string – no, you don’t have to collect sticks yourself; they sell these in Asian grocery stores. Not very high tech, I know, but for under $3 this miniature-looking tatami mat will help roll up the rice-filled seaweed nice and tight.
- Some rice vinegar – Thankfully this stuff doesn’t go bad, as I only ever use a tablespoon or two each time.
- A small tube of wasabi – that hot green condiment of tooth-paste consistency that some people like to stir into their soy sauce or dab onto the rice for extra kick
- Soy sauce – don’t bother with swiping small packets from the Japanese fast food joint in the mall – it’s fairly inexpensive so you may as well just pick up a bottle. It can be used in many other Asian dishes, such as stir frys, so it will get used again.
- If you’re really wanting to be pretentious – but authentic, I suppose – you can buy a container of pink pickled ginger for a garnish, but I don’t bother
Other Ingredients:
- 1 1/2 cups sushi rice
- 2 cups water
- 2 tbsp rice vinegar
- 1 can of tuna, drained
- 3 tbsp of mayonnaise
- 1/4 tsp salt
- 1 large English cucumber, skinned and thinly sliced on the lengthwise
- 1 avocado, thinly sliced (optional)
- 1 package of dried seaweed (sushi nori) – these usually come with 10 sheets per package
Directions:
1. If using an electric rice cooker or steamer, combine the rice and water in the electric cooker pot and continue as directed by the cooker instructions.
2. If using a saucepan to prepare the rice, combine the rice and water in a medium saucepan. Bring to a soft boil, reduce heat to simmer and cover. Cook 18-20 minutes or until all the water has been absorbed.
3. Once rice is cooked, remove from heat and let cool for 10 minutes. Add rice vinegar and fluff with a fork. Rice should be fairly sticky.
4. In a small bowl, mix together the drained tuna, 1 tbsp of the mayonnaise and salt. Set aside.
5. Prepare the cucumber by peeling and thinly slicing it on the lengthwise. Cut the avocado into thin slices.
6. Lay out the sushi mat and place a piece of plastic wrap of equal length on top. I find that this is the least messy way to prepare sushi rolls, otherwise rice gets into the spaces between the sticks and is challenging to wash.
7.Place a sheet of seaweed on the plastic wrap and cover the entire sheet with a thin layer of sticky rice. Usually I place about a half inch of rice across the sheet, though not thick enough that you can’t still see some of the seaweed underneath – it doesn’t have to look perfect.
8. Use your hands or a butter knife and spread 1 tsp of mayo across the rice. You may also want to do the same with a 1/2 tsp of wasabi on the rice layer.
9. Place a few (2 or 3) of the cucumber strips across the middle of the rice/seaweed sheet, so that they run parallel to the direction the sheet will roll up and also so that the strips reach both ends of the roll. Next, place 2-3 tbsp of the tuna mixture across the cucumber strips. You can add the strips of avocado here as well if you choose.
10. Roll up the sheet tightly, then remove the sushi mat and plastic sheet and place the sushi roll seam side down as you cut. Use a sharp, unserrated knife to cut and rinse the blade with cold water between cutting each roll, for an easier, neater cut. Slowly cut 1 inch thick slices – usually the end pieces are a write-off as they come undone for me each time, though they still taste great. Sprinkle the rolls with sesame seeds if you want; serve with wasabi, soya sauce, and yes….those unappetizing pink pieces of ginger if you picked some up and want to be fancy.


Leave a comment